Wednesday, June 24, 2015

Tamiya HG Single-action airbrush set

A skeptic..

I never had any luck with "hobby" grade airbrush kits.
The last one I used, was produced by Testors. Basically, it's a kit with a plastic handpiece linked to a canned propellant.
So, what you need to do: is to hook-up the handpiece with the can, bolt on a siphon bottle and spray.
But, having seen how "easy" the set-up was, I was rather disappointed with the performance of the Testors' kit.
The handpiece nozzle tends to freeze and the paint would splatter rather than adhere on the model kit. 
That said, I gave up the notion of ever dabbling into airbrushing. Well, until I found what Tamiya has to offer.

Performance in a simple package

Straight out of the box, the Tamiya HG single-action airbrush kit came with a small can of propellant.
With it, a simple airbrush handpiece. It's made of metal and can be set to spray a fine or wide mist of thinned-down acrylic paint.
What I found interesting was the price point. Tamiya Underground listed it around RM560 a pop and with a little discount, manage to bring it down to RM495.
Since the handpiece is such a solid working tool (made by a third-party manufacturer known for producing excellent airbrush handpieces), I decided to give it a try.
Now, the killer part here: is feeding the spray with propellant. A can of Tamiya Sprayworks 1800 Aircan costs around RM25 and the larger Aircan 4200 goes for RM47 (without GST).
So, if you don't spray much and tend to build kits once in a blue moon, this set is definitely worth investing in.
I found the handpiece to be really precise in covering small and large areas on the model kit. 
With the right thinner and acrylic paint mixture ratio, you will get a fine mist of paint to cover the parts on your kit.
But with compressed air in a can, there are shortcomings.
The flow of air is inconsistent and as the pressure runs out in the aerosol can, the paint will start to sputter.
Basically, if you are painting a 1:35 tank, you would need at least two cans of Tamiya Sprayworks Aircan 4200 to do the job. 

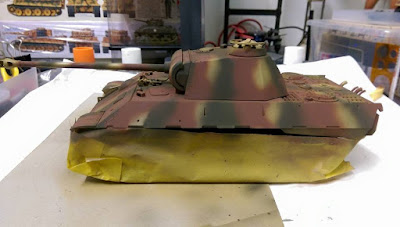
Applying the basecoat on a WWII German Panzer
Three-tone camouflage

The finished Tamiya 1:35 Panther A tank
For long-term modeling..

Since the HG airbrush handpiece can be used with an airbrush compressor, that would be my next investment.
The Tamiya Sprayworks Aircan is simply too costly. 
As for the handpiece, it could be easily cleaned and if you maintain it each time after spraying, the airbrush would give you years of service.
That said, I plan to add at least two more Tamiya HG handpieces to my arsenal to tackle more complex painting tasks.

Saturday, June 13, 2015

Time out: Tamiya M1046 HMMV

A vehicle I have been yearning to build for a long, long time.. 

The High Mobility Military Vehicle (HMMV) is an interesting kit project. There are a few choices in terms of accurately molded kits in 1:35 scale out there. Leading the pack is Tamiya and companies like Academy from South Korea and Hobby Boss (China) are producing the latest incarnation of the HMMV. These include the up-armored HMMVs or better known as Humvees.

The Tamiya M1046 HMMV
My choice: Tamiya

Hands-down, Tamiya has the best fitting kits in the world.
I can't say for other brands because nothing comes close to Tamiya's attention for detail.
So, having said that, I narrowed down my choice for a 1:35 kit.
I found the Humvee at Katon Tomodachi in Atria shopping mall. There was not a single moment of hesitation when I bought the kit.

Assembly and painting

The first thing I did, was to spray the parts on its sprue with a priming coat.
Tamiya has this on a spray can and you can either choose light or dark gray.
Never mix the bottled priming solution into your airbrush because the mixture will gunk up in your airbrush handpiece.

The parts sprayed with an acrylic water-based paint

The upper chassis fitting

Spraying the body
After adding the primer coat, I began to build the undercarriage and suspension system. There are many small parts and it had to be picked and placed onto the undercarriage with a pair of tweezers.

The completed undercarriage
It took me about two days to complete the undercarriage and some touch-ups were needed to conceal the cement stains.
With the Tamiya single-action High Grade airbrush, working concealment is a breeze.
I painted the undercarriage with the Tamiya XF-84 Dark Iron acrylic paint. This gives the part a nice coating and with weathering applied, it looks excellent.

The clear parts with its paint

Achieving that "coated glass" look
As for the upper body of the Humvee, I chose the Tamiya XF-59 Desert Yellow. I was told that a mixture of Matt White and a drop of black would give a really nice "washed" look on the kit.
But I prefer the bare-minimal approach and kept the kit basic. (The Tamiya M1046 HMMV came with a TOW missile launcher).
For the clear parts, I mixed the Tamiya Clear Blue and Green to give the windshield and windows that "coated glass" look.
And I achieved this by spraying the clear parts. It looked convincing enough as I continued to finish the kit by building the door and roof.

Chassis and body

Adding the small parts

Gluing the brake lights
The nearly-completed kit
In-between going to work and coming home, I spent and average of two to three hours building the Humvee.
After completing the chassis and upper body, I glued together the halves by adding a few dabs of super glue.
Once the kit is set, I worked on weathering to give the Humvee that "worn out" look.
Later, I applied a set of decals on the vehicle's rear doors and left it as it is.
To sum it up, the Humvee is a decent kit to construct and being a beginner like me, there were no major issues with putting together this awesome kit..

Friday, June 12, 2015

Time out: Tamiya M151A2 Ford Mutt

A kit that took 32 years to build..

I bought a simple model kit from Hobby Jaya, one of Kuala Lumpur's most renowned model kit store which was located in Sungai Wang Plaza.
It was a Tamiya M151A2 Ford Mutt and it costs around RM16.90.
I was 14-years of age then and it was a real big deal forking out 20 Ringgit for a model kit.
This was one of my many craft projects as a teenager and barely into building it's undercarriage, I abandoned the idea of completing the miniature vehicle.
I tried using a brush and Tamiya acrylic paint, but the results were just too horrible even to show to a six-year-old. 
So, I boxed it up and kept it at my Aunt Lorraine's house in Setapak and left it there after relocating to Subang Jaya.
Since I patched up with my aunt, I went back to her house to rustle up all my old kits. And the Ford Mutt was still in it's box, with parts in the sprues still in "pristine" condition.

The Tamiya kit recovered after 32 years
Model kit building, a form of relaxation...

So, I had a situation at the workplace. Things are getting tough and the only way for release to me, is to build something. I use my brains to think of something constructive and some creativity to put things together and in perspective, broaden my horizon by acquiring a new skillset.
For starters, I am never good at building models and painting them.
The only success I had, was with a Tamiya Panzerkampfwagen kit sometime in the early 80s.
Recently, I bought a Tamiya single-action airbrush which is powered by a can of propellant. Since I had some really bad experience with propellant airbrushes, I was rather skeptical.

Airbrush: A game-changer

I have little experience when it comes to handling an airbrush. 
The only time I got to play with a handpiece was in art school. I sprayed twice. That was all. What I bought, was a Tamiya High Grade single-action airbrush. I believe it was manufactured by another company called Iwata.
Being skeptical at first, I tried spraying some acrylic paint on the Ford Mutt kit. I started with the tires on the sprue and found that the coating of paint was pretty event.
To spray, expert modelers suggested a mix of 2:1, that is two part pain and one part thinner. 
This is tricky, but if you have a plastic pipet (these can be bought from Daiso), you can measure the ratio by how many drops of paint you put in the handpiece cup.

Spraying the wheels in a circular motion..
Priming

Before I began painting and assembling the kit, I sprayed the parts which is still on the sprue with a can of grey paint primer.
This gives the parts an even coat before the acrylic is sprayed over it.

The painted kit, before assembly

Building not according to specs

I wanted the Ford Mutt to have a minimalistic look.
So, I ditched the TOW missile launcher and other parts that fills up the vehicle.
After painting the undercarriage, exhaust and suspension system, I was pretty pleased with the finish.
To get a solid base colour, I used the Tamiya Dark Iron acrylic paint. When applied with weathering, the results were awesome.
I wanted my Ford Mutt to be  a two-seater and there were options on the kit to build it as I like it.
There are no engine on the kit, so detailing it's interior wasn't an option given. Tamiya had produced this kit with the option of having the US Army's colour and markings or simply a US Marine workhorse. I chose none.
My Ford Mutt is as simple as it is..

The finished kit, with some weathering rendered

Another view of the Ford Mutt
Achieving the desired "look"

With the airbrush, I was able to touch-up the kit.

Some unsightly "blemishes" can be removed by spraying a light mist over it.
On the whole, I am pretty happy with the way the kit had turned out.

A pictured of the Ford Mutt with it's box..
I used two cans of propellant to complete the kit.
An airbrush compressor would be even more practical in the long run.
Building this kit was not difficult and having an airbrush is a big advantage if you want your kit to stand out.
The only part that is pretty tough to fit was the windshield. It's just a flimsy piece of plastic that needs to be glued to the windshield's frame.
Since I am not good at painting figures, I gave the Ford Mutt's driver a miss..

Damansara's hobby shop returns..

"Katon Tomodachi"...

Frankie Lim, a friend of mine whom I came to know through master Lee Hong Leng (another old friend who is a Wushu exponent), told me about a new hobby shop in the newly refurbished Atria shopping mall in Damansara Jaya.
I was told that the owner of the store used to operate in SS2 Mall, which is about to be torn down for a new residential project.
As far as I know, there was a small stall in the mall and there was a guy who runs it. He sold an assortment of hobby kits. 
At the time I made contact with the dude, he wasn't too friendly. But, then again, I could be wrong or be too quick in summing up my first-impressions.


The timeless B-29 bomber kit shown at the store's window

Some assembled armor for sale

Once regarded as a nuisance, China's Trumpeteer is now highly sought-after

A selection of warships

Fully-stocked

The store's facade.. 
So, fast-forward to the new Atria mall... I made a beeline to the refurbed building and found parking at the upper-levels of the mall.
Took me a while to locate the store, and I finally found it. It was on the far South-end of the building. 
Katon Tomodachi is located on the second floor. It's a small shop with just enough space to move around. 
There, I met Vincent Leong, the owner.
I found the guy to be very friendly and enthusiastic. There, I engaged in a conversation and learned that he has been in the business for more than 13 years.
"My shop was in the old Atria until I moved to SS2 Mall," he elaborated.
The selection of kits at Katon Tomodachi is quite impressive. 
To sum it up, they have more Tamiya kits compared to the Tamiya Underground. 
And when it comes to prices, I would say it's pretty decent. 
With inflation in mind, there are a lot of kits that can be considered as "overpriced". But I found the rates at this shop pretty reasonable. 
This store has potential to grow as long as people are willing to spend their money there. Apart from retailing, Vincent is also a master-modeler. His craft can be found on display at the store's showcase.
Katon Tomodachi is at lot S05, Second Floor, Atria Shopping Gallery, Jalan SS22/23, Damansara Jaya, 47400 Petaling Jaya, Selangor and opens from 10am - 10pm.